Thursday, February 07, 2013

Some Figure Reviews

This is the first of 3 reviews for Vepa Miniatures new line of modern US figures.  The figures are finely sculpted and cast in white metal, and many have separate arms with weapons.  Jordi Velilla of Vepa Miniatures e-mailed me over the Christmas holidays and kindly offered to send me some figures to review on my blog.  I had only recently heard of the company after reading some reviews of their figures on the great braille scale site On the Way.  Vepa currently produces 2 figure lines: IDF soldiers from the 1982 war in Lebanon, and modern US in Iraq 2012.  Jordi also mentioned that they have SOCOM (Marines and Special Forces in Afghanistan) and Modern Russian sets coming out soon!

Vepa sent me three sets:

  • U.S Infantry House Assault (JVP03-06)
  • U.S Infantry MG/Grenade Launcher Team (JVP03-07)
  • U.S Infantry Mortar Team (JVP03-08)

This review will cover the MG/Grenade Launcher Team (JVP03-07).  The set consists of 2 figures: gunner and assistant, a Browning M2 Heavy machine gun,  an Mk19 Grenade Launcher, a tripod, and ammo boxes for each weapon.  Both figures appear to be dressed in the current US Army BDUs, Interceptor body armor, boots and light weight helmets.  The gunner appears to have a Camelback water carrier that was typically seen in Iraq and Afghanistan.  The detail is very impressive, and cleanup looks like it will be very easy to do without ruining detail.  The only thing that has caught my eye in the set is that the M2 Browning looks a bit small to my eyeball, but I haven't had a chance to measure it yet, and if it is small I have a ton of M2's from various kits that I could use.  I'll follow up on the M2 over the weekend.

I'll try and post reviews of the other 2 sets this weekend, and use some of them in a blog build.  Missing Lynx Braille Scale Board currently has "Middle East 1914-Present" group build going on that these figures are just screaming to be a part of!  So stay tunedm and a big thank you to Jordi and Vepa Miniatures for sending me the figures to review!


Tuesday, January 22, 2013

KV-1 Update

Just a quick update on the 48 scale Hobby Boss KV-1.  I've started the weathering.  Here's the KV after I've applied a green filter, faded using the blended oils (i.e. the dot method), and then a wash using AK's Dark Wash.  I'll probably give it a rust wash next, then start adding dust dirt and grime. It's still a bit to stark for my taste, but should tone down quite a bit as the weathering progresses.


One last thing that some might be interested in.  My ever growing paint selection has been driving me a bit crazy lately because I haven't had a good way to store my paints.  In particular I've had problems with the Vallejo style bottles, which tend to get knocked over easily and roll around.  Well I was in Bass Pro Shop the other day, and stumbled across the Plano 3730 Deep StowAway Utility Box, which is part of their Prolatch Stowaway line.  The boxes dimensions are 14"x 9.3" x 3.25" and it comes with adjustable dividers (they also makes 3731 which doesn't have internal dividers).  It turned out to be a perfect fit for the Vallejo and AK paint bottles, and the dividers are spaced almost perfectly to corral 6 bottles in a section.  It looks like I should be able to fit up to 96 bottles, nice and organized into one box!  It should make hunting for that particular color a lot easier, and keep AK's modulation sets together.  All in all not a bad $9 spent.


Tuesday, January 01, 2013

Happy New Year

I have to admit that I'm intrigued by the current fad in painting and finishing techniques known as color modulation.  Color modulation by itself is too stark, but when combined with various weathering techniques can produce a model that really catches the eye.  I've read various articles by Mig Jimenez, Adam Wilder and others modelers who have popularized the technique to understand the process.  I decided to take the easy route and use the AK Interactive 4BO Green modulation set rather than mix the paints myself.

The set consists of six matched acrylic colors that come pre-thinned for air brushing.  I believe that they are produced for AK by Vallejo.  So in theory they should behave like Vallejo's Model Air line that I've previously used, and be compatible with other Vallejo acrylic products.  For the most part I found this true, and like Vallejo's Model Air, they tend to clog my airbrush quickly.  I have to admit that my airbrushing skills are not the greatest.  Adding Liquitex Flow-Aid help reduce the clogging problem, and an occasional needle cleaning with a cotton swab dampened with airbrush cleaner is all that is needed to get things spraying normally again.


OK, that's enough of a review....on to the model.  Here's my Hobby Boss KV-1 Ekranami using the AK 4BO Green set.  I still need to clear coat it, and then let the weathering begin!  I think I've captured the essence of the technique fairly well.  It's not perfect, but not bad for my first try at the technique.


Saturday, December 29, 2012

Happy Holidays!

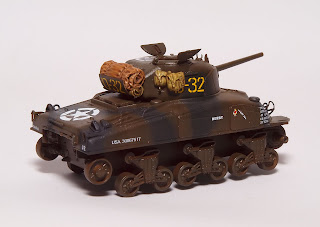
It's currently snowing outside, and it's been a long time since I posted anything.  So I hope everyone has had a Merry Christmas, Happy Hanukkah, Ramadan, winter solstice or whatever you happen to celebrate, and wish you have a better 2013 than 2012.  I at least hope I have a better model completion rate in 2013 than I did in 2012, with blog updates to match.  I only managed to finish one kit (and bought many more than that).  Which brings me to the last update on my 1/72 scale M4A1 "Derby".  I took it to my local IPMS show, MarauderCon, and managed to take Best Armored vehicle.  I can still compete with it at other IPMS or AMPS shows, but this brings Derby to a close on my blog.....unless I pursue my original idea of putting it on a diorama base with a Panzer IV Ausf. J.


Next up is a shelf queen that I've been struggling with for years.  Fujimi's 1/72 scale A-4C.  While I love the kit, it has fought me all the way, and frequently gets put back on the shelf of doom.  I'm close to finishing it, but have manage to break off almost every delicate small part on the kit.  Hopefully it will be one of my early finishes for 2013.


Last up for this posting is my Hobby Boss 1/48 scale KV-1 Ekranami.  The last time I posted anything I had  finished painting and was starting the weathering.  The only problem was that I didn't like the results, so off it went to a Windex bath, and time to start painting again.  I'm going to try AK Interactive's 4BO Green color modulation set, and see how that turns out.


While stripping the paint off I manage to loose one of the photo-etch fender supports.  It seems like I'm always managing to loose some kit part or another, and I've gotten quite good at making a replacement.  Well the fender support was no exception.  The brass Hobby Boss uses is quite thin, and for a while I was stumped on what to do.  Fortunately the Hobby Boss photo-etch fret provides more than enough extra brass to make a new one.  All it takes is some cutters, drill bits, files, sand paper, and about 2 hours!  Ugh...I hope I don't loose another one.  Is it perfect?  No, but more than good enough to put between the two tool boxes on the right fender, and no one will ever know.


While the models was stripped I took the opportunity to make some corrections to the kit based on information available on Neil Stokes' excellent site 4BO Green.  Neil wrote what many consider the KV bible: KV - Technical History & Variants.  It's a great book and an invaluable reference, but Neil also maintains the 4BO Green website with great supplemental material: book addendum's, model reviews, etc..  Among the information are very helpful lists of corrections needed to kits to make accurate versions of respective KV's.  For a late maufactures Ekranami that involves removing the circular weld marks on the sides of the turret roof, filling the hole in the engine hatch, and omitting the saw from the fender (it was moved to inside the toolbox by the time late Ekranami's were produced).


Saturday, July 07, 2012

Just about done

I'm just about finished with my M4A1, and over all I'm quite happy with the results.  There just some minor touch-up painting to do, and a little more weathering and I'm done.  On to the Firefly!


Saturday, April 28, 2012

A bunch of new updates


First things first, wow radical changes to the blogger interface!  Fortunately it look fairly intuitive, so hopefully there will be improvements, but it's hard to complain when its free.  Now onto the model news!  First there is my M4A1 Derby.  I'm still not finished, but I'v finally got some tracks on it, donated from a spare M4A1 late that I plan on converting into an Israeli Super Sherman.  I've also started weathering the lower chassis, and still need to do the top.  I still need to paint the tools add the headlights and figures and add some scale rope to tie down the pallet on the rear deck.  Hopefully I'll have it all done for IPMS NoVa's Model Classic, we'll see.


Nest up is Mike Lampros's Revell 1/72 scale P-51B.  I've got the cockpit all buttoned up in the fuselage, and the wings on.  The fit of the canopy was terrible, so I spent a lot of time sanding, shaping and polishing it.  After I was done, I still wasn't happy because you couldn't see much of the cockpit.  So I pulled out the JLL razor saw and started chopping it up.


Next up is my Academy 1/72 scale P-40N in RNZAF markings. I started the kit years ago, decaling went horribly wrong and it's sat on my shelf of doom ever since.


Last but not least is my Hobby Boss 1/48 scale KV-1 Ehkranami.  I really love this kit, and hope really Hobby Boss gets back into the 1/48 scale armor market.  As I understand it the HB kits are basically scaled down Trumpter KV's which are suppose to be very accurate.  I recently picked up Neil Stokes' KV book, and it sure looks accurate to me,  I can honestly say it was a blast to build.  Decals well that was another story.  They're nice and thin and stuck like glue the second they touched the kit surface that was coated with a liberal wet coat of setting solution.  They wouldn't allow any positioning, very strange.  I'm not sure what I'll do for markings, but a lot of KV-1's didn't carry any.  I'll be starting the weathering next.


Wednesday, March 14, 2012

A rare non-armor post

It's been quite a while since I've posted anything to the blog, but the my biannual trip to New Zealand, and my usual winter modeling slowdown struck. I haven't done much productive modeling in months since I got back. I did have a disaster with the M4A1, the DS track cracked and split when I put them on the tank! To be fair to Dragon I think it was the Tamiya spray primer that caused the problem, but I was so close to finishing the little M4A1 to see the tracks split nearly blew me over the edge. They're ruined, and unusable. Fortunately I've got plenty of spare Shermans, and just need to pull a set out with a fresh drive sprocket.

So onto the airplane! It's Revel's little 1/72 scale P-51B. The kit was one from an IPMS DCers collection, who passed away over a year ago, Mike Lampros. The club had the intention of building several of the kits in honor of Mike, but we've never brought them all in complete. So I'm trying to finish it off and bring it in to a meeting this year. Mike was a great guy, who always was ready to lend a hand and a veritable walking aviation encyclopedia.

So here is the cockpit nearly complete and ready to be sealed up in the fuselage. I just need to finish painting the pilots seat.


Monday, August 15, 2011

Another quick update

I shot a lite coat of Tamiya clear gloss to seal the decals, and prepare the model for weathering. I then used a thin pin-wash using Mig Dark Wash and Brow Wash i all the seams and crevices, and removed the excess wash after it dried with thinner. The model was looking pretty dark at this point, so I shot it with a light coat of Testors Dull-coat, which lightened it up a good bit. and now it's ready for weathering in earnest.


I also took the opportunity to start painting the figures. I decided to go with the 3 half figures by AB Figures. Th figures are about done, just a little touch-up and highlighting to do before they are done.


Saturday, August 06, 2011

Decaling Derby

I started decaling "Derby" this morning. One word of warning if you are anal like me, Dragon didn't get the decals completely correct. I used the 2 pictures of Derby from the Concord books as the primary reference, along with Jim Lewis's Derby build mentioned previously. Most of what you need is on the kit supplied decal sheet, Dragon just doesn't show you were to put everything, and you need to cut up the extra decals to get them correct (or close to correct). I ended up using decals from 2 Dragon M4A1 Normandy kits, a Dragon M4A1 76 Op. Cobra kit, and lastly some Archer US stars. You need the second Derby Decal for the "D-32" decal on the turret bustle rack, and the Cobra kit for the unit marking 2Delta67Delta (the Cobra kit decal is a close 2Delta66Delta).


I've also picked out some AB Figures from my stash to use on the kit. I'm not sure if the co-driver will be sitting outside the hatch or just have his head visible or not, so I picked one of each.


Oh well that's it for now. I still have a few decals to cobble together before I give it another coat of gloss.

Wednesday, August 03, 2011

Another quick update

I decided to do more than a little touch-up on the camouflage job. I didn't like the sharp demarcation line between the od and black. It didn't really match the pictures of other camouflaged Shermans that I have. So I loaded up my trusty Iwata HPC with some thinned Tamiya mixes and carefully work on the transition between the two colors freehand. All in all, I think it turned out pretty good.

I also took the time to paint most of the stowage using various Vallejo Game Colors. First I painted them Dead Flesh for the greens and Bone white for the Khakis. I then used Vallejo thinner and glaze medium, mixed with Cayman Green lightened with the Dead flesh for the green mid-tones, and Khaki for the khaki mid-tones. Finally I gave everything a quick coat of Vallejo's new Washes Green and Sepia on the greens and just Sepia on the khakis. I really love this stuff, it makes things really pop, lightly coats everything and really settles down in the folds. I'll definitely be experimenting with this stuff in the future.