Monday, August 15, 2011

Another quick update

I shot a lite coat of Tamiya clear gloss to seal the decals, and prepare the model for weathering. I then used a thin pin-wash using Mig Dark Wash and Brow Wash i all the seams and crevices, and removed the excess wash after it dried with thinner. The model was looking pretty dark at this point, so I shot it with a light coat of Testors Dull-coat, which lightened it up a good bit. and now it's ready for weathering in earnest.


I also took the opportunity to start painting the figures. I decided to go with the 3 half figures by AB Figures. Th figures are about done, just a little touch-up and highlighting to do before they are done.


Saturday, August 06, 2011

Decaling Derby

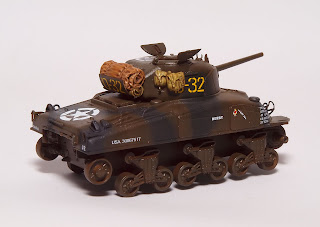
I started decaling "Derby" this morning. One word of warning if you are anal like me, Dragon didn't get the decals completely correct. I used the 2 pictures of Derby from the Concord books as the primary reference, along with Jim Lewis's Derby build mentioned previously. Most of what you need is on the kit supplied decal sheet, Dragon just doesn't show you were to put everything, and you need to cut up the extra decals to get them correct (or close to correct). I ended up using decals from 2 Dragon M4A1 Normandy kits, a Dragon M4A1 76 Op. Cobra kit, and lastly some Archer US stars. You need the second Derby Decal for the "D-32" decal on the turret bustle rack, and the Cobra kit for the unit marking 2Delta67Delta (the Cobra kit decal is a close 2Delta66Delta).


I've also picked out some AB Figures from my stash to use on the kit. I'm not sure if the co-driver will be sitting outside the hatch or just have his head visible or not, so I picked one of each.


Oh well that's it for now. I still have a few decals to cobble together before I give it another coat of gloss.

Wednesday, August 03, 2011

Another quick update

I decided to do more than a little touch-up on the camouflage job. I didn't like the sharp demarcation line between the od and black. It didn't really match the pictures of other camouflaged Shermans that I have. So I loaded up my trusty Iwata HPC with some thinned Tamiya mixes and carefully work on the transition between the two colors freehand. All in all, I think it turned out pretty good.

I also took the time to paint most of the stowage using various Vallejo Game Colors. First I painted them Dead Flesh for the greens and Bone white for the Khakis. I then used Vallejo thinner and glaze medium, mixed with Cayman Green lightened with the Dead flesh for the green mid-tones, and Khaki for the khaki mid-tones. Finally I gave everything a quick coat of Vallejo's new Washes Green and Sepia on the greens and just Sepia on the khakis. I really love this stuff, it makes things really pop, lightly coats everything and really settles down in the folds. I'll definitely be experimenting with this stuff in the future.