Friday, July 29, 2011

Coming along

Derby apparently was camouflaged, although I couldn't tell from the one picture I have of it. Dragon would have you use od and earth brown, but most of the reference I have seen say the 2nd Armored Division used od and black. So I used the blu-tack trick I tried out on the Stug IV and Jagdpanzer to mask off the camouflage of the OD areas so I could spray the black. must confess I copied the pattern from another modeler, Jim Lewis, has a 1/35 scale buildup of Derby om his website, Guntruck. I particularly liked the camo pattern he used on his Derby build, so I copied his. I still have some touch up to do, but I'm pretty happy so far.


As for the Horch I laid down a coat of Tamiya German Grey lighted with a paler grey. I also found a great online reference Vincent Abbott's Smugmug site has a great album with 100 shots of the Horch, and will be a great resource for the second kit.


Sunday, July 24, 2011

Derby and something new

I managed to get Derby to the point where I can start laying some paint down. I shot an initial coat on the tank using the "Zologa formula" U.S. O.D. (ie, Tamiya XF-72 & lightened with XF-60). I've got a lot more painting to do, but I'm happy with the results so far.


I also started work on a new kit: Dragons "Heavy Uniform Personnel Vehicle Type 40." Why Dragon chose to name it that is a mystery to me. I guess some other automaker must own the rights to "Horch" and Dragon must not want to get into a copyright/trademark fight. I've got mixed feelings about the kit, it's only made up of about 54 parts, and assembles very quickly into a reasonably nice looking kit. Dragon also gives you two kits in the box, which is good. I decided to build one "out of the box," well as out of the box as I can build it. I'm probably going to replace the cloth convertible top with one made of 2 part epoxy.

I have almost zero references on the Horch. I guess this gives me an excuse to buy the WWP book :). From what I've been able to find on the internet it looks like Dragon did a good bit of over simplification, but otherwise produced a kit that looks like the real vehicle. I'll probably also add some stowage clutter to the rear storage bin, and maybe add a Preiser figure or three.


Monday, July 18, 2011

Small Derby update

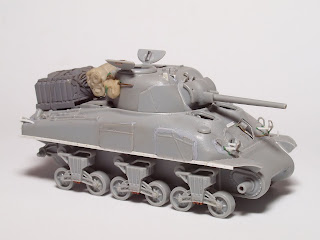
Just another small update on my M4A1, "Derby." I managed to glue the siren to the bracket, and the bracket to the hull without getting too much super glue on anything. Dragon actually includes a bracket on the PE set included in the kit but it didn't look dimensionally correct to me, so I scratched it. I'ce also carved off the lower half of the periscopes on all the hatches, replacing them with a bracket made of aluminum beer can.


I've also added the tools to the back of the tank, adding a little more detail to the kit parts. Dragon's tool layout doesn't look like most of the pictures I've seen of M4A1's, but it appear to be correct for Derby. You can just make out the sledge hammer in the picture in the Concord books, so I went with Dragon's layout. It's probably a case of Dragon getting it accidentally right, because there are so many other details they got wrong on Derby.


That's it for now, I've got a club meeting tomorrow and should probably have something to bring.

Monday, July 11, 2011

A Small update

Shamefully I've done very little modelling the last few months (other than expanding my stash), jumping from one project to the next with the attention span of one of my nephews. One of my problems has been taking the time to finish a model, getting bogged down in small details, which is getting a bit ridiculous for 1/72 armor...but for me it's all in the details. The M4A1 75mm "Derby" is a perfect example. Derby has lots of interesting little details, and the latest for me to get stuck on was the siren bracket that was typical of Sherman's in the ETO in the summer of '44. I was debating making it in Evergreen strip or sheet brass without actually making it.

This past Sunday I was at the monthly Washington Armor Club meeting, and one of my buddies (one of the only other braille scalers in the club) put out a few of his finished recent projects, and mentioned one of his favorite scratch building materials....beer can aluminum! Well it's pretty hot here in DC (several straight days in the mid to high 90's), and a beer can conversion sounded perfect to me. So a very recently emptied can of Yuengling sacrificed itself, and after about 1 hour I had finally crafted the siren bracket. Ok that's it for now, back to modeling.