Sunday, November 16, 2008

and back to the Panzer IV

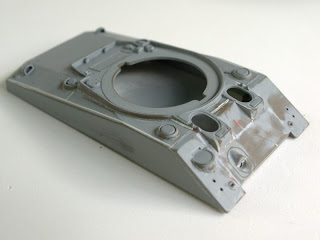
The rain gutters that are above the side turret hatches, as well as the grab handles the crew would use to extract themselves out the hatch, are missing from the kit. The brackets for the turret basket is also missing. All these details were added compliments of an empty beer can, some fine brass wire, and my "hold and fold" tool.


I also took the opportunity to shoot a primer coat on the model. It was really too cold to paint outside, but I managed to get a coat of Tamiya grey primer on. I'll let it dry on a few days before painting anymore.


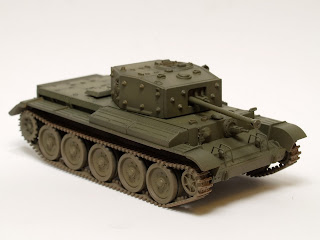
Back at work on the Cromwell

First I shot a coat of Tamiya fine grey primer on the model. Next I mixed up some British olive green using Tamiya acrylics: 50-50 olive green (XF-58) and olive drab (XF-62), and sprayed a light cover coat on the model.


After that dried, I sprayed the lower half of the model and running gear with flat earth (XF-52) and JSDF brown (XF-72). I followed up on the upper surfaces by progressively adding more dark yellow (XF-60) to the olive green mixture (50-50 XF-58&62). I tried using the pre-shading technique by filling the center of panels with the lighter mix, and leaving the darker under coat visible along the edges.


Nest up will be a gloss coat to add the kit decals, followed by a sealer coat, then let the weathering begin.

Tuesday, November 04, 2008

....and more panzer progress

I've added the schurtzen hangers, and turret armor using the kit parts. The turret schurtzen is just dry fitted to the hangers, so I can remove it for painting. There still a few small parts to add, but otherwise it's nearly complete.


Sunday, November 02, 2008

Panzer progress

Here are a few more pictures of my Revell Pannzer IV Ausf. J. I've added the tracks, and they are beautifully done, just like on their Cromwell kit. I took the opportunity to do a little judicious bending to impart the track sag that is usually seen on most Panzer Iv's. I really prefer these solid link and length, then the one piece vinyl included in most Trumpeter kits, or the "DS" glueable tracks that Dragon currently uses. I've also started to add the smaller details to the kit including the turret "shurtzen" hangers, two hooks, tools. etc.


Tuesday, October 28, 2008

Modelling on the road

I was on the road most of last week, and since I was driving, and didn't have to navigate through airport security, I decided to take my travel/camping toolkit and a couple of kits, both were 1/72 scale kits that I'd had sitting on the shelf for too long.

First up was Dragon's Nashorn. The amount of detail include is just incredible, but boy what an over engineered kit! My only real problem was getting the road wheel spacing correct. Dragon has them packed in tighter than my teeth were before my parents got braces put on my teeth! I've still got a good deal to do on the kit, but this is all I could manage while on the road.


Next up is Revell's Pzkpfw IV Ausf. J. It's another great Revell kit, just like the Cromwell I built a few weeks ago. Boy I wish Revell did more armor in 1/72 scale! It goes together so easy, and is engineered like the best Tamiya kits. I did make one addition to the kit, and Aber gun barrel. I picked it up last year, cheep on the discount table. There isn't really anything wrong with the kit barrel, but it makes an already nice kit that much nicer.


Tuesday, October 14, 2008

Back to Hurricane

My "care package" from Great Models arrived on Monday with the Calibre 48 wading stacks, and few other goodies (who'd have thought on Columbus Day!). The Calibre 48 Stacks are very nicely molded in grey resin, and are much nicer than the stacks I was trying to make with evergreen sheet plastic. The stacks are made up of five resin parts, and two PE screens. You have to remove all parts from their casting blocks before the stacks can be assembled.


I was digging around trying to find any and all references on Shemans with wading stacks, when I came across an issue of Military Modelling (Volume 33 Number 6) with a great article by Steve Zaloga on D-Day Shermans. It's a typical Zaloga article, ie, part modelling how to, and part reference treasure trove! Who could ask for anything more?


Unfortunately after reading the article, and looking at the Calibre 48 stacks do I realize that the stacks are wrong for D-Day! They aren't totally wrong, most of the shape is right. The rear exhaust adapter on American D-Day tanks only partially covered the rear engine doors. The Calibre 48 parts completely cover the doors. This would be correct for a 1945 tank, but not for June '44. So now I have to decide whether to just use the Calber 48 part "as is," grind it down and fix it, or make a replacement part. A couple of other thing I noticed were the front intake adapter doesn't just press fit onto the hull, like they show on the instructions. You have to do a little carving on the hull flange to make it fit. Another is that the stack openings themselves are solid resin. The screens simply glue on the fronts. I'm not sure if I'll grind them out, or what, but they don't bother me too much.

Sunday, October 12, 2008

Back to braille scale

I decided to work on a simple 1/72 scale kit, while I waited for Caliber 48's Sherman wading stacks to arrive in the mail from Great Models. Looking over my over large stash of unbuilt kits I spotted Revell's Cromwell IV. I've always heard that this was a nice kit right out of the box, and those reports turned out to be true.

So here is the Revell Cromwell, built straight from the box, waiting to hit the paint booth.


I did manage to make a mistake or two. I managed to glue the exhaust shroud (Part 2) too low on the rear hull (Part 1). I didn't catch it until I glued the upper and lower hull together, and had to pry it off, clean up the damage, and reglue it in the correct place. You can just make out the Mr. Surfacer hiding the damage.


One of the neat construction techniques I've seen on the web, and at club meetings is building the tracks and running gear as a seperate assemble, so it can be painted and weathered off the tank. I've alway wanted to try it. and it turned out pretty good. My second goof up was with the individual track links around the drive wheel. I was a little too aggressive with the sanding stick during clean-up, and ended up having to glue some evergreen stock to the ends of these tracks to make them even with the rest of the tracks.


Monday, September 15, 2008

Hurricane update

Here are some pictures of Hurricane's turret. I filled the pistol port on the left side, thickened the cheek armor on the right side, drilled out the periscope. and added a weld bead to the bottom of the bustle.


The weld beads Tamiya used on the M4 chassis are all wrong. So I glued down some .001x.002 Evergreen strip plastic, then softened it up with liquid cement, and then sculpted the softened plastic with a sharpened eyeglass screw driver. It's hard to make out in the pictures, but turned out pretty well. I added other weld beads using stretched sprue around the smaller castings, and added various drainage holes that were on real Shermans.


I've also worked on the bogies a little. I carved out the the top roller, replaced the skid with the one in the Aber set, and added various holes, nuts and bolts where appropriate.


Lastly there is the lower chassis. I ended up sticking with the Tamiya part, the the Adalbertus one piece housing. I also used my Waldron punch and die set to punch various sized plastic disks to use for panels and bolts.


Sunday, September 14, 2008

Still building braille scale

I haven't abandoned 1/72 armor by any means, or aircraft modelling for that matter either.  I'm still buying and building a little of everything, and sadly never really finishing much of anything.  My wife and I went camping a couple of times this summer, and that's where I've done most of my 1/72 armor.  I took several kits to work on during day light hours.

First up is Dragon's Firefly Vc.  I've always loved the Firefly with it's long barrel, and I really like this kit.  I've built it almost entirely out of the box, with the exception of adding 3 Tichy Train Shops bolts to each VVSS bogie.


Next up is Dragons M4A3 105mm.  Again I'm building this out of the box, just adding bolts to the bogies.


and speaking of after market items!


I've been a long time sufferer of AMS (Advanced Modelers Syndrome).  I just can't seem to build many kits out of the box, and since Hurricane is being built for AMPS competition, I've pretty much given myself [or my wallet] free reign.  I've made a few additional purchases besides the Adalbertus parts.

Aber's photoetch set for the Tamiya M4.  I'm going to try and use almost all of it.


Fighting 48th's Type 51 rubber block tracks, very nicely molded.


Hauler US tank tools.  Shave them off the kit only to glue them back on?


ArmorScale 75mm barrel


Archer stars and shipping stencils


Archer casting symbols - these are cool 1/35, 1/48/ and 1/72 symbols all on one sheet!


Is my shopping spree done? Of course not! I found a Tamiya M4A1, and went ahead and picked it up so I would have a solid drive sprocket. I'd kind of like to have some figures on the tank, I still need to either make or buy the wading trunks, and there's always more reference material!